Current Gaming Projects

Showing posts with label 20mm. Show all posts

Saturday, March 1, 2014

AAR: A Falklands’ Patrol, or Cold-CoC-ing a penguin

Well, it has been a bit since my last blog entry that had any real substance, but I got two more notches on my New Year’s resolutions; I finished another book and got my first game in for the year! 

So first up, I just finished War of the White Death and have now started up The Soviet Invasion of Finland, 1939-40 (Soviet (Russian) Military Experience) by Carl Van Dyke.  If you want to know about the Winter War of 1939-40, I will highly recommend this book, War of the White Death, and the previous book that I was reading, A Frozen Hell.  You really need to read both and read A Frozen Hell first, then War of the White Death.  A  Frozen Hell gives an excellent political overview of the events leading to the Winter War, background of Mannerheim, and the Finnish view of the war.  War of the White Death was written using former Soviet documents and gives an excellent and detailed account of the war from the Russian side of the war.  Matter of fact the author deliberately avoids covering the same material in A Frozen Hell and states that one should read that book for the political & Finnish accounts.

On to the ARR of the game!

This was the first time that any of us played TooFatLardies’ Chain of Command (CoC), so it was a learning experience with a lot time of me sticking my nose in the book looking up things.  I limited who I invited because this was the first time with this system and I wanted Curtis T. & Steve H. as they have played a lot of TFL games before, and Glenn W. as one who has not played a lot of TFL, but has been reading up on various CoC reviews and AARs on other blogs so that he was rather familiar with the system.  We ran the game at the Wargamers’ Cave in IL (Thanks, guys!).   All in all, it is a good system and everyone was catching on how the dice worked and how to do things in the game.  Everyone commented at the end of the game that this was a better system than Bolt Action, which I am taking their word for it as all of them had played Bolt Action and I have not yet.  Unfortunately, as I was spending too much time checking rules as this was the first game and I am not confident with my memory to not look things up (but with repetitiveness, comes confidence and I plan to be repeating this system), I did not make notes of what happen in the game to give a detailed AAR.

While CoC is designed to be for WW2, it is open enough that it can be used for pre & post WW2 games up to a point and some people are already trying to adapt it for post-Colonialism Africa and Cold War era games.  So this first CoC game was using my Falklands conflict figures.  If you go back to some of my previous posts, you will find my stats for the Falklands weapons.  The scenario involved a platoon of British Paras probing an Argentine defensive position.  I used the British Paras rules right out of CoC as their tactics at the platoon level had not changed since WW2.  For the Argentine conscripts, I used the Soviet infantry rules, except I did not give them those national characteristics.  Instead I made one section “Die Hards” as in most of my readings, there was almost always one group of Argentine soldiers that would fight it out and only killing them would stop them from holding on their little bit of the islands.  I also made them Regulars to reflect one of the better infantry regiments, the RI 25.  I also ran the scenario in daylight hours to keep the game simple for spotting for now.

As mention before, a platoon of British Paras were to probe up an Argentine defensive position.  The Paras went light and were not carrying their Carl G or LAWs.  I have not figured the stats for the Carl G or the LAWs was the main reason for not including them in the scenario, but the Carl G was reportedly bad for malfunctions in the very cold climate in the Falklands with only the Royal Marines that had been in the Arctic Warfare training having minimum problems as they had been trained on the proper care methods.  I decided to treat the M79 grenade launcher the same as the rifle grenade.  The extra men of the Para’s platoon headquarters was not available as I assumed that they would be on other duties, wounded, or etc.  This was also the case with the support section for the Argentine platoon.

The Para platoon was being pushed by Steve H. (running the platoon leader and two sections) and Curtis T. (running the platoon sergeant and one section).  The Argentine platoon was being pushed by Glenn W.  It was easy for Glenn to run the whole platoon since there was enough support points that all three sections started entrenched and really didn’t need to move for the game.

The game started with the Argentine conscripts having a Force Morale of 8 and the Para’s with 9.  Unfortunately, Steve did not roll very well for the number of turns to move his Patrol Markers before the game began, (I guess the Argentine troops were using their night vision effectively that night).  So the Paras had to start farther back and had to cross big gap to try to push the Argentine conscripts on a hill.  Steve made good with one section right away for setting up a base of fire on one hill top.  Shortly later, he was able to get a second section on smaller hill in the middle of the board to also provide a fire base.  Curtis moved his section up the one flank of the main hill held by the Argentine conscripts.  For most of the game the Argentine conscripts stayed in their trenches and traded shots with the Para.  The Argentine sniper was especially a troublesome follow for the Para until the Paras finally spotted him and eliminated him in a rather overkill sort of way!

The game ended with the Paras not being in a position to push at least one Argentine section out of their trenches and hurting.  The Argentine conscripts were in better shape, but their Force Morale was in dire straits.  I did not keep any notes during the game, but I believe that the Paras had lost 5 or 6 men out of the 27 and the Argentine conscripts lost about the same number of men, with one being a section NCO, out of 34 men.  The Force Morales were at 8 for the Para’s and the Argentine conscripts had a 4.  The main reason for the major drop in the Force Morale for the Argentine conscripts was the one section NCO was first wounded and later killed.  It appears that he was the most beloved NCO in the platoon because both times that Glenn rolled for the effects of him being wounded, then killed, it was the worst result that could be rolled for the effects on their morale.

I really like what I saw with this gaming system and plan to revisit it again later this year.

Below are some of the pictures from the game with captions below them.

Be seeing you

Sapper


The British Commander signalling his troops forward
Brits on the move
Argentine conscripts are dug in to defend what is theirs
The Para section that was laying down supporting fire for the advance
The effect rolls for the hits against the Argentine sniper!
An Argentine section abandoned their trenches to move into a position to counter assault
Game end - the Paras elected to abandon the attack as the Argentine conscripts in front of them were "Die Hards"


Wednesday, July 31, 2013

Chain of Command – Pre-orders now available


Well, today was the first day for placing pre-orders for the new Too Fat Lardies’ rules, Chain of Command, which will be officially released on August 21.  This is a new set of rules take a whole different route of mechanics from the traditional TFL system of using cards for the sequence of actions.  This system is strictly a dice mechanics for what type of units that can act per turn. 

I am had been looking forward to this set of rules to do platoon size actions, but I will not be using it for the period that it covers, WWII.  I plan to use them to do my ‘Anarchy’ & Falklands projects.  So I might need to change/add a few things, but as the basics of what was available in the 1960s to early 80s really did not change that much from WWII, especially when it comes to an infantry only fight.  Most of vehicles that I plan to use are going to be light vehicles anyway and should not be too different compared to WWII equipment.

I pre-ordered the Big Bundle, which has everything in the Complete Bundle except the 28mm resin Jump-Off markers.  As I never plan to do any gaming in 28mm where I could use them, I decided against getting the Complete Bundle.  So what do I get?  In the bundle will be a hard copy and ether a PDF or an electronic tablet-friendly version of the rules (I will get the PDF), plus 24 game tokens, two green and two grey 24mm Chain of Command dice.  The tokens, dice, and the 28mm resin Jump-Off markers can be found on this Too Fat Lardies blog entry:  http://toofatlardies.co.uk/blog/?p=1652

If you are interested in ordering a set of the rules, visit the TFL web store at http://toofatlardies.co.uk/index.php?main_page=index

I hope to give this system a run in September or October of this year when I am back home using the “Anarchy” project in its first showing.

Cheers,
Joe

Sunday, July 28, 2013

Future 20mm Projects - Minor update

I just mention in the previous entry that I sent off my next batch of 20mm figures to be painted.  One part of that batch are Liberation’s 1980’s USSR VDV paratroopers in jump helmets and berets.  There is enough to get me a platoon, plus some support weapons.  But the bulk of the figures will be for one of two other projects which in these pictures should give you an idea of what is coming down the line.  I bet you can figure them out without any more help.  But before that, I order two 1/64 diecast car sets.  They will be for my "Dark Days in America" project, but somehow, I foresee them in some chase games in the future too...

If you have to ask...I can't explain
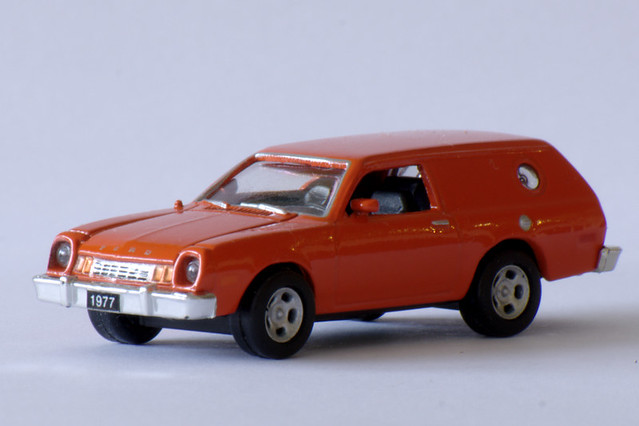
Unfortunately it is 1:87 and not 1:64, and it doesn't have the right back windows, but it is the only Pinto wagon I can find
1970s style LAPD SWAT van to go with my 20mm 1970s SWAT team
Meanwhile, somewhere in Australia
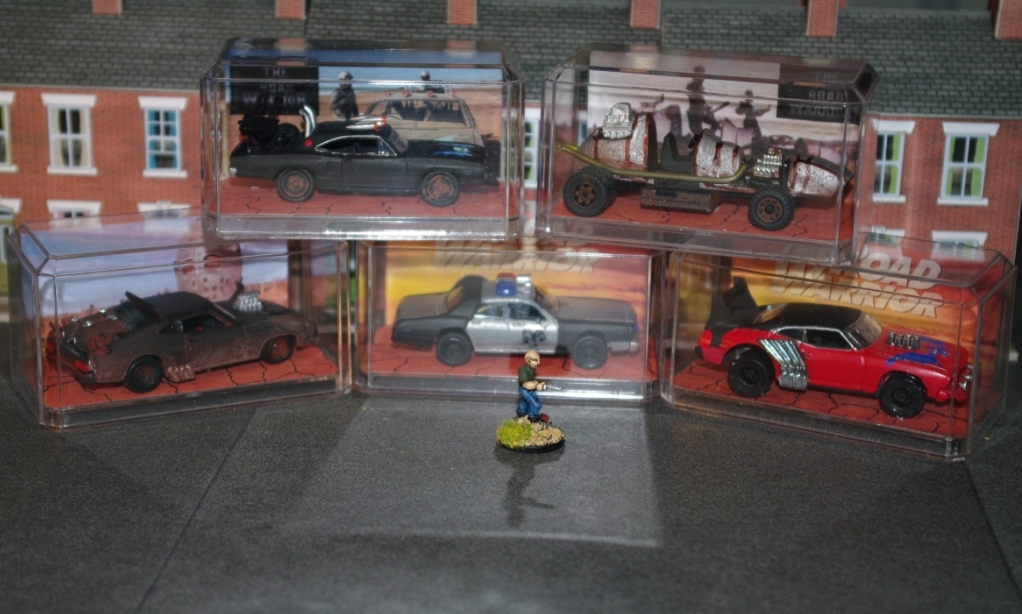
"I am the Nightrider. I'm a fuel injected suicide machine. I am the rocker, I am the roller, I am the out-of-controller!"
"Greetings from The Humungus! The Lord Humungus! The Warrior of the Wasteland! The Ayatollah of Rock and Rolla!"
20mm figure for size reference
Not for a game, but for a display

Painted 20mm goodness – Picture heavy

A while ago, I received my latest batch of painted 20mm goodness from Robert, the fine follow of Northumbrian Painting Service.  I also mailed off my next batch to be worked on as well.  So, what did I get!?!?

First off, let’s start with some of the more mundane stuff.  Here is a group of civilians, mostly old Hotspurs (now Stonewall Figures) and the two male figures in the back row are from Liberation.
This next batch of figures is from the seedier side of town with some thugs and roughs.  They are all the old Hotspurs.
Now these Geezers are not to be messed with unless you got some serious bottle.  Most of the figures are Elhiem, but the short ones in the middle are Platoon 20.
In an area full of these types of Geezers, you want to have a good bodyguard to protect you.  The figure is from Platoon 20 and the car is from Oxford Diecasts.
Here is a large lot of willing volunteers to stand up for the Queen or against her.  This is a group of various mix lot of armed citizens, criminals, cops, or ex-soldiers for the UK Meltdown scenarios.  All of these figures are from Liberation.
Just like the last group, but this time they find a supply of Mk III to Mk V helmets to wear.  Again, all of these figures are from Liberation.
Of course, those previous blokes would either be supporting or facing down the British Army as seen in this next picture.  These squaddies are wearing their Lightweights and Mk IV/V helmets and could be used for Regulars or Territorial’s for the ‘60s up to the early ‘80s.   They are all Liberation miniatures and I am waiting for Rolf’s release of more figures in the Mk IV/V helmets to round out the platoon and support teams.
In effort to show the masses the steadfast resolution of the Iron Lady, the follow two pictures are of another section of squaddies in riot formation.  In the second picture you can see the difference between the newest section (left) to the previous section (right).  This new section has DPM smocks on so I can tell the difference in the sections in a game that has two riot sections involved.  I still have one more section of riot gear squaddies, but I am going to be swamping heads to have some figures not wearing the NBC respirator to represent Big Men.  These figures are from Eureka.
Speaking of NBC respirators, it would not be very much of a Cold War feel of things without seeing the iconic picture of soldiers in NBC protective clothing.  The nice chaps at Elhiem have provided us with British squaddies in their Noddy suits to give me a proper Cold War feel to my Anarchy in the UK project.  Hopefully, one day they will do some nice 1970s-80s looking Americans in their MOPPs suits…that will be the real bee’s knees!
Now on the subject of Cold War Americans, this next photo is of US troops with the iconic M1 steel helmet and the M14 rifle.  While the M14 rifle is more remembered for the early 1960s for the US Army and mid-60s for the Marines, it still trooped on in US Army units in Europe until 1970s and in some National Guard units up to 1980!  Yes, they are still around today as in modified sniper rifles, but I am talking about straight up, line unit weapon.  So what can be more Cold War, the crap has hit fan image other than an Army National Guard squad armed with M14 rifles showing up to battle zombies or Soviet paratroopers.  These figures are from Liberation.
All of this talk about iconic images makes you wonder who is going to take photographs of it?  Well, no fear!  For here are members of the Fourth Estate to get it all on record, thanks to Liberation Miniatures.

When the press is not getting photos of Cold War warriors, they like to be the first on the scene of various incidents and crimes.  This next group of blokes will be sure to give them something to film.  Three of the previously shown Platoon 20 baddies decided to take some hostages.  The hostages are also from Platoon 20.
But those baddies forgot that good guys also wear black!  So in their black uniforms, here are the coppers to bring order to those baddies.  Yes, they are very much modern police and outside of my scope of the 70s, I just am not having much luck finding 20mm British police.  They also have a prisoner in his orange jump suit.  The police figures are from Under Fire and the prisoner is from Platoon 20.
But sometimes the regular boys and girls of the Metro are just not enough to stop the baddies, so that where Agents Bodie and Doyle from CI5 come in with some help from the ‘Old Man’.  The not-Bodie & Doyle minis are from Elhiem and the ‘Old Man’ is from Platoon 20.  The cars are from Oxford Diecast.  I want to point out to any hardcore “The Professionals” fans, the two cars actually have the same plate numbers as the cars from the 1980 season of the show!
But even CI5 just can’t get the job done!  Sometimes the baddies are really, really good and it takes a very talented agent to wrinkle the problem out.  That is when MI6 sends in their best agent, 007 – Bond, James Bond in his Aston Martin DB5. (Cue the strumming guitar!)   Bond is quite well supplied by Q Branch to get the job done from a Walter PPK to a rocket launching gyrocopter.  Bond is also quite handy at turning the tables on the villains of SPECTRE like using a captured Moon Buggy to make an escape.  But Bond especially loves to “borrow” one of his follow swinging agent’s cars to drive around London. (Bond is from Platoon 20; the Aston Martin DB5, the gyrocopter, and the Moon Buggy are from Kyosho; and the Austin Power’s Jaguar is from Oxford Diecast.)

Finally, I am not really sure that even James Bond can stop a horde of….ZOMBIES!!!!   Yes, 60 zombies to fester and bite brave defenders of old London town.    They are all Elhiem except the small headless child in the front, which is an old Hotspur civilian boy who’s head broke off over the years.  Oddly enough, I never got around to throwing it out and when I was sending off the zombies to be painted, I thought that it could be used for another zombie figure.
But there is one more post script to this entry and that is even after the zombie plague destroys most of civilization, there are always some survivors just trying to irk out another day as a living human.  These figures are also from Elhiem.
So there you go, some more painted goodness from Northumbrian Painting Service and I will leave you with two pictures for our moment of Zen of scenario ideas…
Be seeing you…
Sapper

Monday, June 24, 2013

Too Fat Lardies – Chain of Command


I know a lot of you are wondering how can I be so quite then slam out a bunch of blog entries!  Well, it has been raining a lot at work and when it is raining, I can't do much of anything.  So, I will type a couple of paragraphs when I can and when I get enough done and have free time to get on my computer, I post them. 

Well, I am looking forward to this new game system to be put out by Too Fat Lardies: Chain of Command.  Chain of Command will have a major change from the other TFL games with the loss of using cards for the sequencing of events in a turn.  There is a six part video on YouTube (see the links for them below - I could not get them to imbed on my blog) where Richard Clarke of TFL gives us a very good review of the game mechanics.  Mr. Clarke also has a nice breakdown demo of a game on the official TFL blog that can be seen by clicking on this link or go a find it on my list of blogs that I follow on the right hand side of this screen.  If you look around also on the TFL blog, you will see some more entries on Chain of Command.  There are several other bloggers on my list to the right that have been involved in play testing the rules, but as there are quite a few, I will refrain from listing all of their blogs here.

The ground scale is 1:120, according to one of the videos and from the TFL’s blog, which means it is between 12mm and 15mm (1:144 and 1:100 respectively).  So using either scale will get you every close to having everything in scale.  But I know some will prefer to use 20mm or 28mm (1:72 & 1:50 respectfully) instead.  I guess if you want to be a scale purist/Nazi, just double the range & movement would work as that would make the ground scale 1:60.  Personally, I don’t think it will matter too much to what scale that you use between the four of them. 

Speaking of ground scale, this will work nicely for the theoretical frontage for a WWII platoon for a gaming table.   Since most gaming tables tend to be 6’x4’; that means the table will represent about 220m x 150m area.  In theory, during WWII, the average area that a platoon was expected to cover in defense in Europe was 200-300m and in rare cases up to 500m.  A platoon attack frontage was normally around 100m with some exceptions (British did reduce it down to 50m in some cases in the desert and the Germans increased it up to 200m according to the US War Dept’s documents).  Also according to the US War Dept’s documents, the typical German frontage for tank platoons was to have an interval of 90-110m between tanks. So as you can see, the 6’ edge fits within the theoretical frontage of an infantry platoon on defense (200m) and up to two platoons on a deliberate attack (2x100m).  Both sides can also field a couple of tanks on the board (2x100m) means you can keep to small number of vehicles needed for most games.  Even if you go with my 4’ table (about 150m), you can scale down the defenders’ platoon to a depleted platoon of two full size squads/sections or three squads at 66% strength vs. platoon attacking, plus one tank each if staying to the ratios for theoretical frontages.  Solid!

Now, Chain of Command is for WWII, but at its core it should work for the early Cold War, Post-Colonial Africa, the First & Second Indochina Wars, and even the Falklands.  It might even work for some current conflicts between Second and Third World armies, but not First World.  I am more looking at it for the Falklands and my ‘Anarchy in the UK’ projects for platoon level actions and a couple of vehicles.  Once I get the rules and have time to digest the fire combat rules, I probably can alter it to cover the various weapons up to the 1980’s for my periods.  Only making vehicles stats might be a problem.  But since I am more looking at light tanks or APC’s vs. main battle tanks, I think I can knock them out without too much of a hassle.

So I am eagerly waiting for this game’s release and looking forward to using it to storm the Top Malo house with the Royal Marines or to have the Paras trying to wrinkle out the Liverpool Collective’s rebels on the outskirts of the city.

Be seeing you

Sapper